Showing posts with label Windows 7. Show all posts

Thursday, 17 September 2015

// // Leave a Comment

How to Upgrade with Windows 10 your home PC and Laptops

Microsoft has launched the Windows 10 last month, and the most impressive thing is that its free to "Upgrade" with any windows previous version (Windows 7, and 8), 

Windows 10 is familiar and easy to use. It includes an improved Start menu and is designed to startup and resume fast. Plus, it’s packed with new innovations including Microsoft Edge – an all-new browser. Your personal files and apps you’ve installed will all be waiting for you. We’ve designed the upgrade to be easy and compatible with the hardware and software you already use.

Don’t miss out as this free offer won’t last forever, there is two option to upgrade with Windows 10...

  1. Reserve your upgrade today. 
  2. Install the Media Creation tools.


Option : 1. Reserve and Upgrade Today 

Reserve

Windows 10 Icon

  • To reserve your free upgrade, click on the Windows 10 icon located in the lower right side of the system tray.Don't see the Windows 10 icon? First, try running Windows Update and install any available required and recommended updates for your existing Windows 7 or Windows 8 PC. Still don’t see the icon? Click here Right bottom corner of the desktop with a circle around the Windows icon.
  • Once in the Get Windows 10 app, click “Reserve your free upgrade” in the app window.
  • Enter your email if you want confirmation of this reservation.
  • We’ll download Windows 10 to your device and notify you when it’s ready. You can cancel your reservation at any time.


If you'd like to create a USB drive or DVD to download once and upgrade multiple PCs - click here.

Note: This free Windows 10 upgrade is available for PCs and tablets; the free Windows 10 Mobile upgrade will be available for most phones starting later this year.

Upgrade
          • After you have reserved, you are in the queue for your upgrade. Watch for your notification from the Get Windows 10 app to arrive in the coming days or weeks. At that point, you can upgrade immediately or pick a time that works for you.

Enjoy

               
          • After you’ve upgraded, you have Windows 10 for free on that device.


Option : 2. Install Media Creation Tools


If you are not received the update icon on task bar (Windows 10) then you need to download the "Media Creation Tools", this tool also provide you the media create option if you need to install in multiple PC's, required the USB (flash drive) and DVD, before download please read the note.

Note : - 


Make sure you have:
  • An Internet connection (Internet service provider fees may apply).
  • Sufficient data storage available on a computer, USB or external drive for the download.
  • A blank USB or DVD (and DVD burner) with at least 4 GB of space if you want to create media. We recommend using a blank USB or blank DVD, because any content on it will be deleted.
  • Read the System Requirements.
  • If you are installing the operating system for the first time, you will need your Windows product key (xxxxx-xxxxx-xxxxx-xxxxx-xxxxx). For more information about product keys and when they are required, visit the FAQ page.
  • For Enterprise editions please visit the Volume Licensing Service Center.
  • Use the media creation tool to download Windows. This tool provides the best download experience for customers running Windows 7, 8.1 and 10. Tool includes:
  • File formats optimized for download speed.
  • Built in media creation options for USBs and DVDs.
  • Optional conversion to ISO file format
Download the Media Creation Tools


Download Tools Now 32 Bit                       Download Tools Now 64 Bit


Follow the Steps .....

  • After read the "Notes" make you have full fill the all requirement, after that you can start the downloading the "Media Creation Tools", 
  • After Downloading you can close your all open application, kindly save the document before close the apps.
  • Now right click the MediaCreation.exe and select the  Run as a Administrator option.
  • Please wait few min....the new windows will appear, here you can select the option for upgrade the OS, Option (1) Can be used when same PC you need to upgrade with Windows 10, Option (2) Can be used when you Upgrade the another PC, select the option as you required,

  • As below image we have selected the Option (1) then click the "Next" and sit back because it will download the OS almost (3Gb). 
  • After downloading complete you get the next windows for the action. 
  • It will start the installation process, which you see the below image. 
  • After process will complete you PC will restart automatically so don't panic while installation it will restart couple of times.
  • After restart complete you can see the installation logo.

                            
  • When all below option is complete, PC will restart one more time and after restart you will get the updated Windows 10. 
"Your review and comments are most important to us, your comments are encourage us and give the power to our passions"
Read More

Thursday, 2 April 2015

// // Leave a Comment

Solved "The Computer Restarted Unexpectedly or Encountered an Unexpected Error Windows Installation Can't Proceed"

(Figure-1)


If Windows Setup fails in the middle, you may find your desktop sitting with a dialog box that says, "The computer restarted unexpectedly or encountered an unexpected error. Windows installation cannot proceed."  This means specifically that Windows rebooted during mini-setup, but it tells you nothing about why.

Note : It might be happen while first time boot setup, PC power lose.

The process is very simple to resolve this issue, you can follow the below instruction..

  • When "Error" is appear in screen press the "SHIFT+F10"
  • You will get the command prompt screen as below.(Figure-2)
 
Figure-2
  • Type "Regedit" 
  • And Expand the "HKLocal machine/SYSTEM/SETUP/STATUS/ChildCompletion"


  • While click on "ChildCompletion" Right side penal you will find the "Setup.exe" in  "REG_DWORD".
  • Now "Setup.exe" "REG_DWORD" data need to be change from 1 to 3.
  • Close the registry penal and restart the PC, you have resolve the issue. 


Read More

Monday, 10 March 2014

// // Leave a Comment

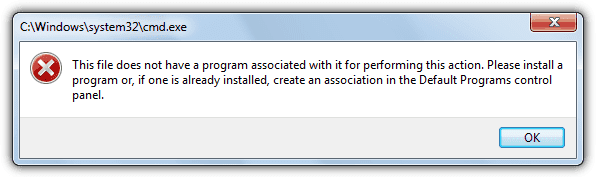
How to Fix "File Dose not have associated with it Performing this action" Windows 7,8

This issue might occur because of a potential virus.

  • Since when are you facing this issue?
  • Are you facing this issue after installing any Windows Updates?


Now you might be need to fix this issue, disparately it will frustrated  to you, so now the time resolve this issue..

Method - 1


  • First you need to download the below button and download Fix_Associated_Error Reg  


 Download
  • Right click the downloaded .reg file on the Desktop and click on Merge.
  • Click on Run, Yes (UAC), Yes, and OK when prompted.
  • When done, you can delete the downloaded .reg file if you would like to.


Method - 2

Microsoft Provided Solution

As the error message clearly indicates, setting association for the file extension in control panel should fix this problem.
Here’s how:

  • Open Default Programs by clicking the Start button, typing default programs and then clicking Default Programs.
  • Click on Associate a file type or protocol with a program.
  • This opens list of extensions. Click on any of the extensions.
  • To change the default program for the particular extension, click on change program button.
  • Select the program you want to open with and click OK.
  • Additional information on other default program settings:

Change which programs Windows uses by default

This should fix the above issue.

for the original post click here
Read More

Wednesday, 18 September 2013

// // Leave a Comment

How to Enable Telnet Client in Windows 7


It's very rare that I use Telnet these days, so it took a long time for me to notice that by default it was not packaged with Windows 7.  I did some research and found out that this was also true for Windows Vista.  More than likely this was an attempt to make Windows more secure by default, as Telnet is very insecure and whenever you have the choice you should always use SSH.  However, with that being said, you can quickly re-enable Telnet by following these steps:

  • Click Start
  • Control Panel
  • Programs And Features
  • Turn Windows features on or off
  • Check Telnet Client
  • Hit OK
  • After that you can start Telnet via Command Prompt.

Another Method:

Open a command prompt window.

  • Click Start,type cmd in start search box, and then press Enter.
  • Type the following command

pkgmgr /iu:"TelnetClient"

  • If the User Account Control(UAC) dialog box appears, confirm that the action it displays is want you want, and then click continue.
  • When the command prompt appears again, the installation is complete
Read More

Saturday, 20 April 2013

// // Leave a Comment

Set Custom Login Background Screen on Windows 7


Windows 7 makes it possible to change the welcome screen that appears when you start your computer without any third-party software, but this setting is well hidden. You can set any image you like as your background.
This setting is intended for original equipment manufacturers (OEMs) to customize their systems, but there’s nothing stopping you from using it yourself. All you have to do is change a single registry value and put an image file in the correct location.

Enabling Custom Backgrounds

This feature is disabled by default, so you’ll have to enable it from the Registry Editor. You can also use the Group Policy Editor if you have a Professional version of Windows – scroll down a bit for the Group Policy Editor method.
Launch the Registry Editor by typing regedit into the search box in the Start menu and pressing Enter.

In the Registry Editor, navigate to the following key:
HKEY_LOCAL_MACHINE\SOFTWARE\Microsoft\Windows\CurrentVersion\Authentication\LogonUI\Background


You’ll see an DWORD value named OEMBackground. If you don’t see it, right-click in the right pane, point to the New submenu and create a new DWORD value with this name.
Double-click the OEMBackground value and set its value to 1.


Note that selecting a new theme in the Appearance and Personalization window will “unset” this registry value. Selecting a theme will change the value of the key to the value stored in the theme’s .ini file, which is probably 0 – if you change your theme, you’ll have to perform this registry tweak again.


Changing the setting in group policy will allow it to persist even when you change your theme, but the Group Policy Editor is only available in Professional editions of Windows.

If you have access to the Group Policy Editor, launch gpedit.msc from the Start menu.


Navigate to the following section in the Group Policy Editor window:
Computer Configuration\Administrative Templates\System\Logon


You’ll find a setting named “Always use custom login background.” Double-click it and set it to Enabled.


Setting An Image

Your image file must be less than 256 KB in size. It’s also a good idea to use an image file that matches the resolution of your monitor, so it won’t look stretched.
Windows looks for the custom logon screen background image in the following directory:

C:\Windows\System32\oobe\info\backgrounds

By default, the info and backgrounds folders don’t exist. Navigate to the C:\Windows\System32\oobe folder and create them yourself by right-clicking inside the folder, pointing to New, and selecting New Folder.


Copy your desired background image to the backgrounds folder and name it backgroundDefault.jpg.


(I can see the inevitable question coming in the comments, so if you like this wallpaper image, you can get it here.)
The change will take effect immediately – no system reboot required. The first time you log out or lock your screen (try the WinKey-L keyboard shortcut), you’ll see your new background.


Read More

Monday, 7 January 2013

// // Leave a Comment

Troubleshoot Your System For Memory Problems In Windows 7


Windows 7 includes built-in features to help you identify and diagnose problems with memory.

If you suspect a computer has a memory problem that isn't being automatically detected, you can run the Windows Memory Diagnostics utility by completing the following steps:


Step 1: - Click Start, type mdsched.exe in the Search box, and then press Enter

Step 2: - Choose whether to restart the computer and run the tool immediately or schedule the tool to run at the next restart.

Windows Memory Diagnostics runs automatically after the computer restarts and performs a standard memory test automatically. If you want to perform fewer or more tests, press F1, use the Up and Down arrow keys to set the Test Mix as Basic, Standard, or Extended, and then press F10 to apply the desired settings and resume testing.

When testing is completed, the computer restarts automatically. You’ll see the test results when you log on.

Note that if a computer crashes because of failing memory, and Windows Memory Diagnostics detects this, the system will prompt you to schedule a memory test the next time the computer is restarted.
Read More

Tuesday, 25 September 2012

// // Leave a Comment

How to Restore Windows 7 Genuine


Every time you format and reinstall your PC, you have to activate Windows again, which can sometimes be a pain once you’ve done it too many times. Here’s how to backup and then restore the activation status.
Note: we aren’t going to cover how to reinstall Windows, since you should know how to do that already. This article just covers backing up and restoring your activation.
Introduction
Advanced Token Manager easily allows you to back up all the information that Windows uses to check the validity of you copy of Windows. Collectively called a Token, this information can be backed up to an external storage medium. Once you have formatted you can import the Token and your Windows will be genuine again.
Backing Up
Once you have grabbed your copy of Advanced Token Manager from here, you can extract the zip file and then run the executable file.


When the advanced token manager launches, you will see the BIG Backup Activation button. Click it to begin backing up your token. All the “BBB” characters are just masking the real product key, don’t worry that is not your real product key.


Once you click the Backup Activation button, we expect that 99% of you will be prompted with this message. Unless some of you are ultra geeky and using KMS at home, you will get this message. You can just click yes to continue.


Once activation is finished being backed up, you will see a folder called “Windows Activation Backup” in the same folder that you launched the token manager from, this contains the backup.


Now we have reloaded Windows on the same PC, as you can see it is not activated.
-->

Now I can run the advanced token manager, this time it will say Restore instead of Backup.


Once you click Restore you will be prompted to make sure you want to do this, click the next button to start the restoration.


Once it has completed a success message will appear.

If you go check your validity in the System Settings, you should have the genuine badge back.


The advanced token manager can also support Office Activation and works on all versions of Windows 7.
-->
Read More

Friday, 14 September 2012

// // Leave a Comment

Create Customize Windows 7 Disc with Integrated Updates


-->
Do you want to save time when installing Windows 7 ? You can create a customized installation disc and have it perform an installation without asking you questions, integrate updates and drivers, tweak Windows, and remove Windows components.


We’ll be using RTSe7en Lite for this – if you’ve used nLite with Windows XP or vLite with Windows Vista in the past, it works similarly. RT Se7en Lite is a sort of vLite or nLite for Windows 7.

What You’ll Need


  • Run the StartCD.exe file, select Windows AIK Setup, and follow the instructions on your screen to install Windows AIK.


  • You’ll also need a Windows 7 installation source – either a physical disc or ISO file.
  • Next, downloadand install RT Se7en Lite from here – it’s free and donation-supported. Download the appropriate version for your version of Windows — x86 if you’re using a 32-bit version of Windows or x64 if you’re using a 64-bit edition.


Using RT Se7en Lite

  • First, click the Browse button and provide your Windows 7 files – if you have an ISO file on your hard drive, click Select ISO file and navigate to it. If you have a Windows disc, insert the disk, click Select OS path, and navigate to the disc.


  • If you provide an ISO, you’ll have to specify an extraction path where the ISO’s files will be extracted to – you’ll need several gigabytes of space on your hard disk for this.


  • The files will be automatically extracted after you provide your ISO.
-->


  • After selecting the edition of Windows 7 you’re customizing, RT Se7en Lite will load the image. If you have a Windows 7 disc without Service Pack 1 integrated, click the Slipstream Service Pack option in the “Select an image to configure” window and you’ll be able to integrate SP1.
  • Click over to the Task pane and select the tasks you want to perform after the image is loaded. You can manually check the check boxes or select a preset. Selecting one of the check boxes will activate the corresponding configuration pane at the left side of the window.


  •  The integration pane allows you to integrate Windows updates, drivers, language packs, and even third-party applications into your installation disc. To integrate updates, you’ll have to download their installer files and load them into RT Seven Lite with the Add button.


  • On the Features Removal or Components tab, you can permanently remove components from your Windows installation disc and control which Windows features are installed by default. For example, you can remove the included games from your Windows installer disc, or force Windows to install the IIS web server by default.


  • The Tweaks tab allows you to customize the default settings for the Windows Control Panel, Desktop, Explorer, and a variety of other Windows components. You can even add custom registry settings to tweak other settings that aren’t present in the list.


  • The Unattended section allows you to create an unattended installation disc – you provide answers to installation questions beforehand and Windows will install without asking you these questions during the installation process.
  • For example, you can enter your product key ahead of time so Windows won’t ask you for it. The other tabs allow you to control other settings – for example, selecting the hard disks that Windows will install on. If you complete enough of these settings, Windows will install automatically without asking you any questions during the installation, allowing you to perform an unattended Windows installation.


  • The Customization pane allows you to add custom screensaver, wallpapers, themes, documents, and even logon screens to your Windows 7 disc.


On the ISO Bootable pane, you can create a ISO image from your customized installation disc. You can also burn it to a DVD or copy it to a bootable USB drive.


-->
Read More

Saturday, 11 August 2012

// // Leave a Comment

How to Control Your Computer via Gmail ?


How To Control Your Computer via Gmail


Now control your PC from anywhere!

If you've ever wanted to control your PC from a distance location, you can do so now by sending certain predefined commands through your Gmail account. Start downloads, run any program, play any sound, take screenshot, kill a program, get files, move files, and do much more!

sRemote, a mere 38 KB program, to control your PC [ or your friend's from anywhere in the world, using any device that can send emails!


Step by step information for how to use this:


  • Extract the downloaded files to a safe location and open sRemote.exe, Upon initial launch, you will need to input a master password to access the application. It uses this password to verify the actual user of the PC where commands are to be executed. Just enter the password, and click Proceed to open the application’s main interface.


  •  Next we need to configure your Gmail accounts, so click Gmail Settings at the bottom left. enter emails IDs for the account you want to monitor as well as the account where you want the notifications to be sent


  • Click Start Monitoring button and leave the application running


  • How to send commands: (read following lines very carefully) : you can send commands to sRemote from any email id and from anywhere in the world, using any mobile device. You write the commands in the subject. [sRemote monitors only the first 250 characters] Each command is terminated by a semi-colom “;”. the basic syntax of every command is: command(); for eg. screenshot(); OR run(http://www.somesite.com/download.zip); in the subject field, first you need to enter the password. If the password is not found, then sRemote will not process the commands. So, if you want to get the screenshot, you have to write [supposing you password is "Ra98123456"] Ra98123456();screenshot();and email it to the gmail id which sRemote is monitoing. [you'll get a mail with the screenshot attached.]


List of commands:

[be sure to enter password first in every email] [for details or description refer to commands.txt]

screenshot();
shutdown();
logoff();
restart();
abort();
run(program,parameters);
play(path);
msg(text);
log(text);
exit();
beep();
forceshut();
mail(sender,password,receiver,body,subject);
processes();
ping(address);
getfile(path);
delfile(path);
deldir(path);
uptime();
copy(oldpath,newpath);
move(oldpath,newpath);
help();


Read More

Thursday, 12 July 2012

// // Leave a Comment

Hard Disk Diagnostic Tools for Soft Repairing

Powerful Hard Disk Diagnostic Tools


Hard Drive is the main data storing part of computer, it's storing your useful and important data. Unfortunately if Hard Disk can fail, did't work properly or slow processing, So therefore you can use the soft repairing tools, it will help to improve the performance and set the Hard Disk Error. Many company are manufacture the Hard disk but we talk only the Seagate, WD (Western Digital), IBM , Hitachi , Fujitsu about a soft repair tools.


CHKDSK Utility 


The CHKDSK is the windows utility has been around forever and is still used for checking HDDs. It is used for repairing problems related to bad sectors, cross-linked files, lost cluster and directory errors. To access this hard drive diagnostic tool:

Go to Start/Computer and right click on the drive you want to scan. Click Properties, go to the Tools tab and click Check Now.


S.M.A.R.T Scans 


Most modern hard drives are equipped with S.M.A.R.T. - Self-Monitoring and Reporting Technology. This hard drive diagnostic tool looks for evidence of impending mechanical failure, and can also tell you if a recent bump or power failure has created any potentially harmful hard drive errors.

There are lots of free S.M.A.R.T. utilities available on the Internet. One of them is
 PassMark's DiskCheckup™ tool.

Hard Disk Utility by Manufacturer 


The manufacturer of your hard drive will also have their own proprietary tools for doing hard drive diagnostics. You can find the tools on the manufacturer's website - they will help you diagnose problems with the disk surface and generally check the HDD.
Here are the hard drive diagnostic utilities available from some popular hard drive manufacturers:


Diagnostic Software 


There are also freeware utilities available on the web that will let you know when your hard drive is about to fail. Use third-party software for hard drive diagnostics if:
  • You have already run chkdsk, and are still experiencing serious problems that make you suspect disk surface errors or imminent hard drive failure.
  • You don't know the manufacturer of your hard drive and aren't confident of taking apart your computer to find out.
  • You've already backed up your hard drive! If you suspect an upcoming hard drive crash or a bad disk surface error, back up your data immediately - don't fiddle round with installing hard drive diagnostic software until you've done this important step.
  • In fact, if you are aware enough of potential computer problems to run hard drive diagnostic software, you've already won half the battle. Back up your data and replace your hard disk - hard drives are incredibly cheap nowadays. Buying a new drive is much cheaper than trying to recover data from a failed one.

Read More