Monday, 24 March 2014

// // Leave a Comment

How to login Multiple User in One Computer in Windows XP


This is really superb solution to use single computer by multiple user, in built RDP (Remote Desktop Protocol) provide to access the computer remotely but it has a limited only single user can be take a remotely at a time.

Typically, if you were logged in with RDP on a computer, if someone else tried to remote into that computer at the same time, you'd be bumped off. There are a couple of cases where you might want or need simultaneous RDP sessions. You and your partner could both access a home computer's programs and files while at work, for example. Or, as TechSpot suggests, you could have a dedicated Media Center PC in the living room and remotely access all the files on the computer without interrupting someone watching TV.

This patch will enable two or more concurrent sessions in Windows XP PRO Service Pack 2 (SP2) and Service Pack 3 (SP3) if you have FAST USER SWITCHING enabled, and your windows is NOT in a domain.

Uninstaller is also included and can be found at windows Control Panel -> Add or Remove Programs.

Download Installer - Windows XP 


Read More

Monday, 10 March 2014

// // Leave a Comment

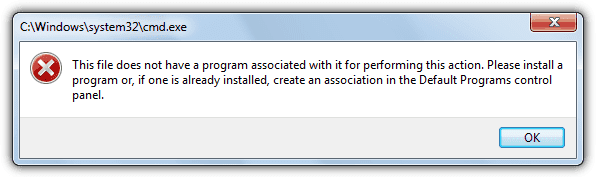
How to Fix "File Dose not have associated with it Performing this action" Windows 7,8

This issue might occur because of a potential virus.

  • Since when are you facing this issue?
  • Are you facing this issue after installing any Windows Updates?


Now you might be need to fix this issue, disparately it will frustrated  to you, so now the time resolve this issue..

Method - 1


  • First you need to download the below button and download Fix_Associated_Error Reg  


 Download
  • Right click the downloaded .reg file on the Desktop and click on Merge.
  • Click on Run, Yes (UAC), Yes, and OK when prompted.
  • When done, you can delete the downloaded .reg file if you would like to.


Method - 2

Microsoft Provided Solution

As the error message clearly indicates, setting association for the file extension in control panel should fix this problem.
Here’s how:

  • Open Default Programs by clicking the Start button, typing default programs and then clicking Default Programs.
  • Click on Associate a file type or protocol with a program.
  • This opens list of extensions. Click on any of the extensions.
  • To change the default program for the particular extension, click on change program button.
  • Select the program you want to open with and click OK.
  • Additional information on other default program settings:

Change which programs Windows uses by default

This should fix the above issue.

for the original post click here
Read More

Wednesday, 5 February 2014

// // Leave a Comment

How to Disable SmartScreen Filter in Windows 8?

"SmartScreen" filter was introduced by Microsoft in Internet Explorer 8 (IE8) web browser. It was developed to provide better security to IE users. SmartScreen filter automatically checks websites and files for malicious content and warns you if it finds something suspicious. SmartScreen filter is also present in IE9 and IE10 versions.

Microsoft has implemented the same mechanism in its latest OS Windows 8. Windows 8 comes with SmartScreen filter enabled by default. If you try to run a downloaded program from Internet, it checks the file and if it finds an unrecognized app, it blocks the program and shows following message on screen:

Windows protected your PC


Windows SmartScreen prevented an unrecognized app from starting. Running this app might put your PC at risk.


If you click on OK button, the program execution is terminated. If you are sure that the program is safe, you can click on "More info" link given in the message and it'll provide 2 buttons: "Run anyway" and "Don't run".


You can click on "Run anyway" button to launch the program.

Although its a good security feature in Windows 8 but many times you might find it a little annoying. SmartScreen filter shows the same warning message for almost all 3rd party programs which are downloaded from Internet.

If you have a good antivirus program and if you think the downloaded programs are safe, you can disable this SmartScreen feature in Windows 8 to remove these irritating warning messages.

Just follow these simple steps to turn off SmartScreen filter in Windows 8:

1. Open Control Panel and click on Action Center icon. Alternatively you can open it by typing Action Center at Start Screen and it'll show it in Settings section of search results page.

2. Now click on "Change Windows SmartScreen settings" link given in left sidebar.


3. It'll open SmartScreen settings window. Now you can select "Don't do anything (turn off Windows SmartScreen)" option and click on OK button.


4.That's it. It'll immediately turn off SmartScreen feature and you'll no longer get the warning message in Windows 8.
Read More

Sunday, 26 January 2014

// // Leave a Comment

You must know 10 things about Windows 8.1


Windows 8 was very different from Windows 7, but change is only speeding up — Windows 8.1 has seen quite a few changes since Windows 8. You’ll have new things to learn, whichever which version of Windows you’re upgrading from.
This isn't an exhaustive list, but it will help you get to grips with Windows 8.1 and locate the settings you may be looking for — especially if they've moved since Windows 7 or 8.

Desktop Options Aren't Enabled By Default

Microsoft made a significant effort to make Windows 8.1 less awkward for desktop users, but the only difference you’ll notice by default is that the Start button is back. If you want to boot to the desktop and prevent the app switcher and charms from appearing when you move your mouse to the top corners of your screen, you’ll need to configure these options yourself. To do so, right-click your taskbar, select Properties, and change the options on the Navigation tab.


You Can Shut Down in Two Clicks

Press Windows Key + X or right-click the Start button to open the power user menu. This menu contains shortcuts with quick access to commonly used options like the Control Panel, Task Manager, and File Explorer. On Windows 8.1, you can now shut down from this menu — it takes just as many clicks as it did on Windows 7.


Default File Associations Are Still Frustrating

Windows 8.1′s file associations are still obnoxious for desktop users. When you open an image from the desktop, you’ll be whisked away to the full-screen Modern interface with your taskbar and entire desktop hidden. It would make sense for each environment to have its own file associations, so you’d see a desktop program when you opened a picture from the desktop, but Microsoft hasn't done this.
If you use the desktop, you’ll need to head into the Default programs control panel and change the default file associations for images, PDFs, music, and video files.


Bing Integration Can Be Disabled

Microsoft’s Bing search engine is integrated in Windows 8.1, allowing you to easily search with Bing from the system’s search feature. To accomplish this, searches you start typing on your computer will be sent to Bing’s servers. If you’d rather not have the searches you type sent to Bing, you can disable Bing integration from the Search and apps panel in the PC Settings app.


Tiles Aren't Created By Default

Windows 8 automatically created tiles on your Start screen when you installed a Windows 8 app or desktop program. Windows 8.1 no longer does this, allowing you full control of your Start screen layout. To add tiles for newly installed programs, click the arrow button or swipe up on the Start screen. Right-click or long-press an application shortcut and select Pin to start to create a tile for it.

SkyDrive Only Syncs Files in the SkyDrive Folder, Mostly

Windows 8.1′s SkyDrive integration will only synchronize files and folders in your SkyDrive folder at C:\Users\NAME\SkyDrive. You can’t synchronize folders outside of this folder, and the old symbolic link trick won’t work either. SkyDrive will also sync the photos in your Camera Roll folder, but it won’t sync other images in your Pictures folder.
To sync another folder, you’ll have to try moving it into SkyDrive and creating a symbolic link elsewhere.


Libraries Are Hidden By Default

Libraries are now hidden by default, even though they’re still used heavily by Modern apps. For example, image applications have access to your Pictures library, while video players have access to your Videos library.
To make libraries visible again, right-click in the left pane of the File Browser and select Show libraries.

Internet Explorer’s Two Interfaces

Internet Explorer still offers two interfaces — the full-screen, Windows 8-style one and a desktop application. When you launch the Internet Explorer tile from the Start screen, you’ll see the Windows 8-style Internet Explorer.
If you’d rather use the desktop version of Internet Explorer when you click the Internet Explorer tile, open IE on the desktop, click the gear menu, and select Internet options. Click the Programs tab and set Internet Explorer to open “Always in Internet Explorer on the desktop.”
If Internet Explorer isn't your default browser, it will always open on the desktop and you’ll be unable to change this setting.


Snap is improved


Snap is an extremely important part of using Windows 8 apps, as it allows you to use multiple apps at a time. It feels fairly limited on a laptop or desktop, but it’s refreshing and powerful on a tablet.
To snap an app, swipe in from the left of your screen and position the app’s tile at the left or right sides of the screen. It will snap alongside the current app. With a mouse, move your mouse to the top-left corner of the screen and drag-and-drop the app’s tile onto your screen where you want it. You can now re-size the apps to use as much space as you like or even view three or more apps on screen at once, depending on your screen resolution. Windows 8.1′s Modern interface is much more powerful than Windows 8′s.


Administrative Tools Are Hidden By Default

The system tools found in the Windows Administrative Tools folder — applications like the Task Scheduler, Event Viewer, Services, and Computer Management tools — are normally hidden. They won’t appear in your All apps list and you won’t be able to find them by searching your installed applications, either. If you need them, head to the Start screen, press Windows Key + C, select Settings, select Tiles, and enable the Show administrative tools option on the Tiles pane. They’ll show up in All apps and appear when you search for them by name.


Read More

Tuesday, 24 December 2013

// // Leave a Comment

NTSC and PAL video standards

NTSC and PAL video broadcasting standards

There are currently two types of analog format used to broadcast video signals throughout the world. Certain parts of world use NTSC, which stands for National Television System Committee, while other parts of the world use PAL, which is short for Phase Alternating Line. There are several important differences between PAL and NTSC signals which are good to know about since they affect how certain technologies (such as DVDs) work in different countries. This Bamboo AV Advice article will help you to understand the differences between NTSC and PAL video standards, and will give you a good overview of what will happen to television systems and broadcasting standards in the future. NTSC will be the first video standard examined, followed by PAL.

NTSC format

NTSC stands for National Television System Committee, and is the analog format used by the majority of television American broadcasters. NTSC was developed in 1940 to establish a common broadcasting standard following the popularity of television and the introduction of analog television signals. NTSC images conform to a standard of an interlaced image made up of 525 horizontal lines with a refresh rate of 30 frames per second. Any standard definition picture with a maximum horizontal resolution of 720 lines and a 480 vertical resolution limit with a frame rate of 30 frames per second can be defined as NTSC and will play on a device designed for NTSC television. Numerous amounts of consumer video products, such as DVDs have been tailored to work to this standard and thus output in a resolution of 720 x 480. If a DVD uses an unsupported digital standard, many manufacturers of DVD players have implemented the ability to convert the signal to analogue and “squeeze” the image frame to fit the video.
Countries using NTSC
NTSC signals are used predominately in the Western hemisphere. The territories and some of the more notable countries that use NTSC broadcasts are listed below.
North America
Canada
Mexico
United States
Central America and the Caribbean
Costa Rica
Cuba
Guatemala
Honduras
Nicaragua
Panama
South America
Bolivia
Columbia
Peru
Asia
Burma
Japan*
Philippines
South Korea
*Japan uses a variant known as NTSC-J that has a slightly lower level of darkness.

PAL format

PAL, which stands for Phase Alternating Line, is the video standard used primarily in Europe and Africa for displaying television, DVD, and VHS pictures. The system was primarily introduced because of the inability of the 50 Hz power grids in European countries to accept the existing 60 Hz NTSC standard, and because of the colour shift that can occur during poor transmission weather. As a result, in 1963 Walter Bruch of Germany unveiled a television standard with a frequency of 50 Hz and a better quality picture than NTSC.
The PAL format outputs interlaced images at a resolution of 720 x 576 (86 more vertical lines than NTSC) with a refresh rate of 25 frames per second (5 less than NTSC). This means that while PAL broadcasts have a superior picture quality, NTSC images appear smoother, especially during high motion footage such as action films or sports.
Countries using PAL
PAL signals are most common in Europe and Africa. The territories and some of the more notable countries that use PAL broadcasts are listed below.
Africa
Nigeria
Ghana
Cameroon
South Africa
Asia
China
India
Philippines
Vietnam
Europe
Czech Republic
Denmark
Ireland
Italy
Poland
Portugal
Romania
Spain
Ukraine
United  Kingdom
South America
Argentina
Brazil
Paraguay
Uruguay
Oceania
Australia
New Zealand
A map showing the parts of the world that broadcast in PAL and NTSC
The image above shows a world map of the distribution of PAL and NTSC video standards usage.
The future of NTSC and PAL
In the last few years the penetration of High Definition televisions into homes has been consistently on the rise. As a result there has been an increased amount of demand for digital signals that can contain 5.1 audio and High Definition broadcasts. Both NTSC and PAL are analog formats, which means that they have a limited bandwidth incapable of broadcasting Dolby Digital sound or High Definition images. In the near future there will be little need for these analog signals.
Numerous countries around the world have set mandates to phase out and stop any further analog broadcasts and replace them with digital high definition broadcasts. For America, on February 8th 2006 George W. Bush signed the “Digital Television Transition and Public Safety Act of 2005” into law. This set February 17th 2009 as the date when all NTSC transmissions will be turned off permanently. NTSC broadcasts will be replaced with ATSC (which stands for Advanced Television Systems Committee), a standard that will broadcast digital High Definition images.
In Europe there are already countries that have fully converted to digital signals. The countries currently using the new digital format DVB – T (Digital Video Broadcasting – Terrestrial) are listed below:
Andorra
Finland
Luxembourg
Netherlands
Sweden
Switzerland
The remainder of the European countries have all set deadlines similar to those of the United States for when PAL broadcasts will be permanently stopped.
Read More

Tuesday, 12 November 2013

// // Leave a Comment

5 Ways to Access Your Files From Anywhere

5 Ways to Access Your Files From Anywhere


Having remote access to your computer or files from anywhere means you never have to worry again about forgetting an important file. You can travel lightly and also do business from just about anywhere you have an Internet connection. Here are several ways to access your files from the road ... and even remotely control or manage your computer from afar.

1. Use Remote Access or Remote Desktop Apps

One of the simplest ways to remotely access your computer is to use one of the many free or subscription-based programs that set up the connection for you. These programs let you log into your home computer from a Web browser on the remote computer (e.g., a workstation at the office or cybercafe) -- or, in some cases, even from an app on a mobile device like a smartphone or the iPad -- and work on your home computer as if you were sitting in front of it. The most popular remote access programs include:

LogMeIn: offers both a free version that works with Windows PCs and Macs for remote desktop control as well as a Pro version that also enables file transfers, remote printing, and more.
GoToMyPC: is a subscription-based service from Citrix starting at $19.95 per month for one computer (Mac or PC). GoToMyPC offers similar advanced features, like drag-and-drop file transfer, that the paid LogMeIn Pro version includes. There's a free trial, so you can compare GoToMyPC with the free version of LogMeIn to see which works better for you.
UltraVNC: is a free, very configurable program that uses VNC (Virtual Network Computing) technology for remote desktop sharing. It offers many advanced features like special graphics drivers, encryption plugins, and Windows authentication, but can be more complex to configure.

2. Share Files with a NAS (Network Attached Storage) Device 

If you don't need to remotely control or manage your home computer and just want to be able to access shared files over the Internet, you can use a NAS device (a.k.a. NAS box) to do so. These storage devices are mini file servers that you connect to your home network, usually via Ethernet cable to your home router. They run about $200, but it may be a very useful investment; NAS devices are great for file sharing and backups for multiple computers, and they typically offer remote file access via FTP or even your Web browser, depending on the device. Popular NAS boxes that let you access your files remotely include: Buffalo Linkstation and Apple's Time Capsule.

(More: About's Guide to Wireless/Networking has a selection of entry-level NAS products for home users as well as an Introduction to NAS.)

3. Add an External Hard Drive to Your Home Router

Another remote file sharing option would be to add an external hard drive to your existing (or a new) home router -- if your router has the capability to enable file sharing, that is. The Netgear WNDR3700 Router, for example, is a wireless dual-band (offers both 802.11b/g and 802.11n) router with a "ReadyShare" feature for sharing a USB storage device over the network and via FTP. The Linksys Dual-Band WRT600N is a similar router with network storage capabilities. Although using an external hard drive connected to your router will be slower than a dedicated NAS, this option may be less expensive if you already have an external drive to use and/or the router.

4. Use Online Backup and Syncing Services

For remotely accessing files from anywhere without having to set up any hardware, turn to cloud computing services, specifically online backup and file syncing Web apps. Online backup services provide automatic offsite (essential!) 

storage of your files and typically also allow you to download individual files from a Web browser or mobile app. Carbonite, Mozy, CrashPlan, and BackBlaze are a few online backup services to look at. As PC World points out, there are also additional options for low-cost backup, including using your Webmail or Web hosting service to store 

files online -- and these can also give you remote access to your files.

Dedicated file syncing services and applications are specifically designed to always keep your most important documents with you or accessible wherever you go. Dropbox and SugarSync automatically mirror a folder or several folders on your computer to their online servers. It's like having a file server in the cloud; you can share files with others and, in some cases, even edit files in your browser and sync with mobile devices.

5. Set Up Your Own Home Server

Finally, if you don't want to use a third-party solution and would rather set up your own VPN and server, both Apple Mac OS Server and Windows Home Server claim to make home or small business networking and remote access easy. 

(And of course there are many different Linux Server flavors; most of the NAS devices run on Linux.) This option is the most expensive and time-consuming to set up, but offers you the most control.
Read More

Wednesday, 2 October 2013

// // Leave a Comment

How to Recover Important Data from Dead Computer

Uh-oh, your computer isn't booting anymore. Maybe it’s a problem with Windows, or maybe the computer’s hardware is fried. If you have important files trapped inside your malfunctioning computer, this guide will help you recover them.

There’s no guarantee your data is recoverable. If your computer isn't working because the hard drive died, there may be no recovering the files — not without some sort of expensive professional data recovery service, at least.

Boot From a Linux Live CD (or Windows Installation Disc)

If your computer’s hardware has actually died on you and that’s the reason it’s not booting, this method won't work. However, the computer may not actually be dead — its Windows installation may just be damaged. If this is the case, you can recover your files by booting from a Linux live CD or even a Windows installer disc.

Just insert the Linux live CD or Windows installer disc into the computer and start it up. If it boots from the disc and takes you to a Linux desktop or a Windows installation environment, you know that the computer’s hardware isn't completely broken. If you're just interested in recovering the files, you can connect a USB stick or external hard drive and copy the files to the removable media device. Your files will then be saved from your dying computer.

This is simple to do with a Linux live CD, as you'll be given a full Linux desktop that you can use for copying files. If you have a Windows installation disc, you can use a trick to pull up a file management window and copy files off the computer’s hard drive.

This method may even work if your computer’s hard drive is dying. If you're lucky, the computer may not be able to boot Windows but you may be able to recover some important files off of the drive from the Linux live CD or Windows installation environment.

Pull the Hard Drive and Put it In Another Computer

If your computer won't boot a Linux live CD or Windows installer disc, its hardware components may have died on you. There’s some good news if this is the case — while the computer’s motherboard, CPU, memory, video card, power supply, or any number of other components could be damaged, the computer’s hard drive may still be working properly. If this is the case, you can open up the computer, pull the hard drive, connect it to another computer and get the files off of your hard drive using the other computer.

First, a warning: This can void your warranty, particularly if you're doing this on a laptop that isn't designed to be opened. But if you have a desktop that you can easily open and work on, or you have an old laptop that’s out of warranty and didn't have much life left in it, you may want to go ahead with this process anyway.

The basic process is simple, but you'll ideally need to be comfortable working with the insides of a computer. First, ensure the main power switch at the back of the computer’s case is shut off — or better yet, just unplug the computer from the power outlet. Next, open the computer’s case and locate the hard drive. Disconnect its cables, unscrew it, and pull it out of the case. For more in-depth information, consult our guide to installing a new hard drive — you're basically going through the process in reverse.

You'll then need to connect the hard drive to another computer. You can do this by inserting the hard drive into the other computer or using an external drive bay. If you have laptop hard drive and need to connect it to a desktop PC, you can get drive bays designed for laptop hard drives that will allow you to safely connect the laptop’s hard drive to another desktop. Power on the other PC, booting its standard operating system from its main hard drive, and copy the files from your old computer’s hard drive.

This process is fairly simple on desktops with cases you can open, but it’s much harder on laptops — especially closed laptops that aren't designed to be opened at all. If you’re not comfortable doing this with your computer or you have a closed laptop that you’re not comfortable opening, you may want to contact a computer repair shop or a service desk at a big box store to help you with this process. They can pull the hard drive for you and hopefully recover the files. Assuming your files are valuable and you’re willing to pay, this is always an option.
Read More