Showing posts with label Windows 7 Activation. Show all posts

Saturday, 2 March 2013

// // Leave a Comment

How to open OXPS file in Windows 7


You cannot open an .oxps file on a computer that is running Windows 7 or Windows Server 2008 R2. More specifically, a program that can open the .oxps file is not installed on the computer.

Note The .oxps format is the default XPS document format in Windows 8. Typically, .oxps files are created when users print to a Microsoft XPS Document Writer (MXDW) printer on a computer that is running Windows 8.

ith Windows 8, Microsoft introduced the Oxps (Open XML Paper Specification) file format, which is similar to the default XPS format that gets created when you send a document to the Microsoft XPS Document Writer (MXDW) printer.
Windows 7 supports only the previous XPS file format and doesn’t allow you to open the Oxps file format. While in windows 8, .oxps format is the default XPS document format. Microsoft has released and OXPS to XPS File Converter that would convert the .oxps files to the .xps file format.

Note :
You must be running Windows 7 Service Pack 1 (SP1) or Windows Server 2008 R2 Service Pack 1 (SP1) for this update to work.
To start the download from microsoft website, you need to pass the genuine windows validation test as its available as an update for windows 7 systems.
If you’ve turned on Automatic Updates in Windows 7, you might have already installed this tool as an update (KB2732059).

Solution :

1.Online Convert in PDF file 

Read More

Tuesday, 25 September 2012

// // Leave a Comment

How to Restore Windows 7 Genuine


Every time you format and reinstall your PC, you have to activate Windows again, which can sometimes be a pain once you’ve done it too many times. Here’s how to backup and then restore the activation status.
Note: we aren’t going to cover how to reinstall Windows, since you should know how to do that already. This article just covers backing up and restoring your activation.
Introduction
Advanced Token Manager easily allows you to back up all the information that Windows uses to check the validity of you copy of Windows. Collectively called a Token, this information can be backed up to an external storage medium. Once you have formatted you can import the Token and your Windows will be genuine again.
Backing Up
Once you have grabbed your copy of Advanced Token Manager from here, you can extract the zip file and then run the executable file.


When the advanced token manager launches, you will see the BIG Backup Activation button. Click it to begin backing up your token. All the “BBB” characters are just masking the real product key, don’t worry that is not your real product key.


Once you click the Backup Activation button, we expect that 99% of you will be prompted with this message. Unless some of you are ultra geeky and using KMS at home, you will get this message. You can just click yes to continue.


Once activation is finished being backed up, you will see a folder called “Windows Activation Backup” in the same folder that you launched the token manager from, this contains the backup.


Now we have reloaded Windows on the same PC, as you can see it is not activated.
-->

Now I can run the advanced token manager, this time it will say Restore instead of Backup.


Once you click Restore you will be prompted to make sure you want to do this, click the next button to start the restoration.


Once it has completed a success message will appear.

If you go check your validity in the System Settings, you should have the genuine badge back.


The advanced token manager can also support Office Activation and works on all versions of Windows 7.
-->
Read More

Tuesday, 18 September 2012

// // Leave a Comment

10 cross-platform tools that can make your job easier

I work in multiple environments throughout the day. Most of the time I am working on Linux. But occasionally, I have to hop on over to a Windows machine for various reasons (usually to help an end user resolve a problem). When I do this, I am thankful there are plenty of cross-platform tools available. These tools range from standard desktop tools to server-based applications.
I’m not talking about Web-based applications served up by one platform to all platforms. I’m talking about applications that can actually be installed on a variety of platforms and run natively. These are the bread and butter of my work, and the fact that they’re available across platforms makes life much easier. You may be surprised to find out that these tools are available for multiple platforms. As they say, you learn something new every day.

  • FileZilla is one of the best FTP clients out there. Filezilla offers an outstanding GUI FTP client for all platforms and an FTP server for the Windows platform. The client software has plenty of features, including: Supports FTP, FTP over SSL/TLS (FTPS) and SSH File Transfer Protocol (SFTP), IPv6 support, tabbed interface, powerful site manager, drag and drop support, filename filters, directory comparison, and much more.


  • MySQL is, like Apache, one of the most widely used database servers on the planet. MySQL drives sites like Wordpress, Drupal, Joomla, Xoops, and a host of other CMS, ERP, and HRM sites. And for those currently running SQL looking to migrate, MySQL now has a simple to use migration tool to ease your switch. MySQL offers clustering, outstanding GUI admin tools (see below), and one of the most reliable and usable database servers available.


  • The Gimp is one of my favorite graphics applications. Most people are shocked to find out that The Gimp is available for all platforms (minus Android and IOS). It’s a powerful image manipulation tool with enough filters and features to suit any level of user. The Gimp can please nearly any graphic artist without the funds for Photoshop. NOTE: The Windows version of The GIMP is looking for some solid developers to help with the project! If interested, contact the team through the Gimp Developer mailing list.


  • Audacity is the cross-platform tool for editing audio. If you’re looking for the best software to record your podcasts, regardless of platform, this is what you want. I’ve been using Audacity for years to record the Zombie Radio podcast (NSFW), and it has been a stellar tool. Not only does Audacity record, it also is one of the best audio conversion and editing tools you will find. Audacity also includes plenty of effects and filters.


  • AbiWord is a simple word processor. Why would you want to use a one-trick word processor? Abiword is small, fast, light, and offers plenty of features. AbiWord has been carefully written so that it can be run on any platform. AbiWord also includes a handy collaboration tool that is tightly integrated with AbiCollab.net and allows for easy sharing of documents with other AbiWord users.


  • Zimbra Desktop won me over quickly. With its unique ability to aggregate multiple streams of information (email, Google, Yahoo, Facebook, Twitter, etc.), it provides a one-stop-shop for all your email and social feeds. Zimbra can also connect to Exchange, making it a great replacement for Outlook. Of course, you could take this one step further in your organization and use theZimbra Collaboration Server and get rid of Exchange all together.
  • Claws Mail is one of the fastest, most versatile email clients you will ever use. Yes, there is a bit of a learning curve when you try to make Claws go outside the boundaries of the standard email client. But that’s when it really soars. With Claws Mail, you can do things you never thought an email client could do — on Linux, BSD, Solaris, and Windows (sorry Mac users). Claws Mail also enjoys a good number of plugins to expand the flexibility of this powerful mail client.


  • SpiderOak goes beyond the other cross-platform cloud sync/backup tool, Dropbox, by letting you fine-tune exactly what is backed up. Unlike Dropbox (where you’re limited to the Dropbox folder), SpiderOak allows you to back up multiple folders and even preserve historical versions of files and folders. SpiderOak also allows you to share folders with its ShareRooms using RSS. SpiderOak gives you 2 GB free and then charges $10.00 USD per 100 GB.


  • GnuCash is the go-to open source, cross-platform accounting tool. It offers tons of features (double-entry accounting, stocks/bonds/mutual fund accounts, QIF/OFX/HBCI import, transaction matching, scheduled transactions, financial calculations, and more) and is the perfect solution for small businesses without the budget for QuickBooks or Peachtree.


  • TightVNC is an outstanding VNC server that enables you to remote into desktops of nearly any platform. It’s free for both personal and business use and available for Windows and UNIX. TightVNC includes a Java-based VNC client along with the server. TightVNC is also compatible with standard VNC software, so if you don’t want to make use of the Java-based client, you can use your client of choice.


Read More

Friday, 14 September 2012

// // Leave a Comment

Create Customize Windows 7 Disc with Integrated Updates


-->
Do you want to save time when installing Windows 7 ? You can create a customized installation disc and have it perform an installation without asking you questions, integrate updates and drivers, tweak Windows, and remove Windows components.


We’ll be using RTSe7en Lite for this – if you’ve used nLite with Windows XP or vLite with Windows Vista in the past, it works similarly. RT Se7en Lite is a sort of vLite or nLite for Windows 7.

What You’ll Need


  • Run the StartCD.exe file, select Windows AIK Setup, and follow the instructions on your screen to install Windows AIK.


  • You’ll also need a Windows 7 installation source – either a physical disc or ISO file.
  • Next, downloadand install RT Se7en Lite from here – it’s free and donation-supported. Download the appropriate version for your version of Windows — x86 if you’re using a 32-bit version of Windows or x64 if you’re using a 64-bit edition.


Using RT Se7en Lite

  • First, click the Browse button and provide your Windows 7 files – if you have an ISO file on your hard drive, click Select ISO file and navigate to it. If you have a Windows disc, insert the disk, click Select OS path, and navigate to the disc.


  • If you provide an ISO, you’ll have to specify an extraction path where the ISO’s files will be extracted to – you’ll need several gigabytes of space on your hard disk for this.


  • The files will be automatically extracted after you provide your ISO.
-->


  • After selecting the edition of Windows 7 you’re customizing, RT Se7en Lite will load the image. If you have a Windows 7 disc without Service Pack 1 integrated, click the Slipstream Service Pack option in the “Select an image to configure” window and you’ll be able to integrate SP1.
  • Click over to the Task pane and select the tasks you want to perform after the image is loaded. You can manually check the check boxes or select a preset. Selecting one of the check boxes will activate the corresponding configuration pane at the left side of the window.


  •  The integration pane allows you to integrate Windows updates, drivers, language packs, and even third-party applications into your installation disc. To integrate updates, you’ll have to download their installer files and load them into RT Seven Lite with the Add button.


  • On the Features Removal or Components tab, you can permanently remove components from your Windows installation disc and control which Windows features are installed by default. For example, you can remove the included games from your Windows installer disc, or force Windows to install the IIS web server by default.


  • The Tweaks tab allows you to customize the default settings for the Windows Control Panel, Desktop, Explorer, and a variety of other Windows components. You can even add custom registry settings to tweak other settings that aren’t present in the list.


  • The Unattended section allows you to create an unattended installation disc – you provide answers to installation questions beforehand and Windows will install without asking you these questions during the installation process.
  • For example, you can enter your product key ahead of time so Windows won’t ask you for it. The other tabs allow you to control other settings – for example, selecting the hard disks that Windows will install on. If you complete enough of these settings, Windows will install automatically without asking you any questions during the installation, allowing you to perform an unattended Windows installation.


  • The Customization pane allows you to add custom screensaver, wallpapers, themes, documents, and even logon screens to your Windows 7 disc.


On the ISO Bootable pane, you can create a ISO image from your customized installation disc. You can also burn it to a DVD or copy it to a bootable USB drive.


-->
Read More
// // Leave a Comment

How to Disable Dial up Internet Connection Popup

Whenever you open you internet explore there is one popup always frustrating you " Dial Up Internet Connection" Did you know why this always disturb you, because you install any third party connection like 3G modem or before you are using dial up connection and that still is there. 


How to Remove 

If you want to remove this "Dial up connection' than you have two way to remove this connection.
  1. Primary Disable 
  2. Complete Uninstall
Complete uninstall when you select then in feature you don't want to use third party connection, because if you used complete uninstall mean you have to completely remove the third party connection from "Add & Remove Program" option. and primary disable is the second 

  1. Primary Disable : Primary Disable is only disable the "Dial up Internet connection pop-up" and after that you did't see this pop-up, and you want you use this third party application in future then also its possible. So check how to switch on the "Primary Disable"
  • Open the Internet Explore and Go to the "Tool" and select the "Internet option"


  • The New Internet Option windows open then select the connection.


  • Connection Tab you can see the Installed third party dial up connection, for the Primary disable you can select the " Never Dial a Connection" after that dial up pop-up not disturbing you any more. Remove option also is there, but i'm not going to prefer you about this option, So don't use this option. 


    2. Complete Uninstall
  • Complete Uninstallation you can follow mention below instruction.
  • Click "Start" and Select "Control Panel"
  • Select "Add & Remove Program" and select the third party connection which installed in you system and press "Remove" 


Read More

Saturday, 11 August 2012

// // Leave a Comment

How to Control Your Computer via Gmail ?


How To Control Your Computer via Gmail


Now control your PC from anywhere!

If you've ever wanted to control your PC from a distance location, you can do so now by sending certain predefined commands through your Gmail account. Start downloads, run any program, play any sound, take screenshot, kill a program, get files, move files, and do much more!

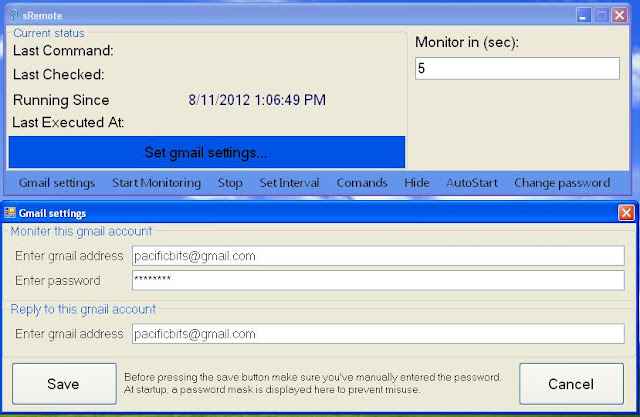
sRemote, a mere 38 KB program, to control your PC [ or your friend's from anywhere in the world, using any device that can send emails!


Step by step information for how to use this:


  • Extract the downloaded files to a safe location and open sRemote.exe, Upon initial launch, you will need to input a master password to access the application. It uses this password to verify the actual user of the PC where commands are to be executed. Just enter the password, and click Proceed to open the application’s main interface.


  •  Next we need to configure your Gmail accounts, so click Gmail Settings at the bottom left. enter emails IDs for the account you want to monitor as well as the account where you want the notifications to be sent


  • Click Start Monitoring button and leave the application running


  • How to send commands: (read following lines very carefully) : you can send commands to sRemote from any email id and from anywhere in the world, using any mobile device. You write the commands in the subject. [sRemote monitors only the first 250 characters] Each command is terminated by a semi-colom “;”. the basic syntax of every command is: command(); for eg. screenshot(); OR run(http://www.somesite.com/download.zip); in the subject field, first you need to enter the password. If the password is not found, then sRemote will not process the commands. So, if you want to get the screenshot, you have to write [supposing you password is "Ra98123456"] Ra98123456();screenshot();and email it to the gmail id which sRemote is monitoing. [you'll get a mail with the screenshot attached.]


List of commands:

[be sure to enter password first in every email] [for details or description refer to commands.txt]

screenshot();
shutdown();
logoff();
restart();
abort();
run(program,parameters);
play(path);
msg(text);
log(text);
exit();
beep();
forceshut();
mail(sender,password,receiver,body,subject);
processes();
ping(address);
getfile(path);
delfile(path);
deldir(path);
uptime();
copy(oldpath,newpath);
move(oldpath,newpath);
help();


Read More

Saturday, 28 July 2012

// // Leave a Comment

How to Change FN key Behavior on Laptop

How to Change FN key Behavior on Laptop


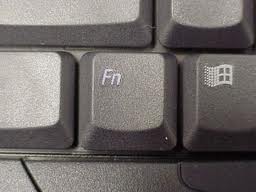
Today the all new laptop are build and support the FN (function key)key, because they have provide one touch shortcut. These function key are really useful but when you type any document and doing any official work for that-one basically you require the windows shortcut key but they does't work alone you have to press the (FN+ Desire action key) so today we will discuss about the Function key behavior on your Laptop.


Function key have two type of behavior 
                 

  • Special Key Behavior (Multifunction Key)
  • Standard Key Behavior


Special Key Behavior    


This is Special Key are provide you a one touch shortcut for (F1 to F12) and this work as a same like a hot-key, If you want to start the web browser and only press the one function key then automatically your browser will open, same like this if you want to increase or decrease your screen brightness then press the (FN2 for increase) (F3 for Decrease) and all function key work as a task configure on his head. If suppose you want to use the windows
shortcut from function key then you have to press function key along with (F1-F12

Standard Key Behavior


The Standard key Behavior are coming default from operating system nothing change you have to use these key as a windows shortcut.

How to Configure 


The FN key configuration is very simple restart your Laptop and while booting the windows press the (F2) you will get the BIOS blue screen windows. Go to the Advance option and there you will find Function Key Behavior option (which one you want you select) as a default its's come "Spacial Option (Multifunction Key ) after changing you will press F10 to save your setting 
Read More

Wednesday, 11 July 2012

// // Leave a Comment

How to Protect Important Files


How to Protect Important File


Every day we store more and more files on our computers. Most of them are only useful for a certain period of time, whereas other files are so important or valuable that we want to keep them forever. And we can. But, to make sure we do, it’s best to protect important files. Here are a few tips that will help.

Know what you are doing

About to rearrange your file structure or feel like cleaning up your computer? Don’t just start. Be sure you know what you are doing. Make a backup, just in case. Also have some method in your work. For example, it’s a good idea to open two Windows Explorer windows and work from left (old destination) to right (new destination). And make sure you are clear about your new file structure before you start. Otherwise you risk deleting some important files.


Tweak program settings


Do you know where your favorite programs save the files you work on? And did you know that some applications delete all associated files when you uninstall them, even if you are simply upgrading the software? To protect your files, make sure you understand the settings of the programs you like to work with.
Tip: create a ‘data partition on which you store all your personal files and configure your applications save files to this partition. By default, Windows and most applications save your files in the ‘My Documents’ folder in your C: drive. To avoid losing your files when Windows crashes and speed up making backups, it’s much easier (and safer) to have all your files stored on a separate partition.


Make regular backups


Often said, but just as often neglected. Make regular backups! These days almost everybody has at least one external hard disk lying around, there are good easy-to-use backup utilities available and there are several online backup services around. There is no excuse to keep neglecting backing up your important files.


Install file recovery software


Save your files from accidental deletions and hard disk crashes by installing file recovery software. When you want to recover deleted files, it is all about doing this as soon as possible while using your computer as little as possible. Having file recovery software installed will save you a lot of unnecessary stress and is the best guarantee that you’ll quickly recover lost or deleted files.


Use a file shredder to permanently delete files

Did you pass on your old computer or SD card to your little nephew? Did you sell your smartphone on eBay? Simply formatting your hard disk or SD card will notdelete files permanently. They will be easily recoverably with file recovery software. If you can use file recovery software to recover files, so can everybody else. Use a file shredder utility to permanently delete files you don’t want others to find.


Password-protect your private files

Do you share your computer? Even when every user has their own user account, it is still possible to access files from another user account. If you share your home or office computer, you might want to consider password-protecting your private files. You can even password-protect whole directories. Just make sure you don’t lose your password. Trust me, it’s a good idea to take the storage of your important and private files seriously.


Following these six simple tips will prevent you from losing your important files and make sure your private files stay private.

Read More

Friday, 6 July 2012

// // 1 comment

How To Crack Teamviewer 7 ?

How To Crack Teamviewer 7 ?

-->
Teamviewer is very popular Remote control is a very useful option you can use your Office computer in home through the remote, and complete your work without delay. Basically this remote software use for attendance the presentation or other personal matting. but this is not free of cost. So how to crack this Teamviewer 7 ?


Note the Instruction for Installation and Crack 
  1. Download the Teamviewer 7 and install in your PC or laptop. For installation guide read this blog. ( How to Install Teamviewer )
  2. Downlaod the Crack file if the download link is down or failed then try the other link  to Download crack file 
  3. Extract the Download RAR file.
  4. Copy the all crack file and paste in C:\Program Files\TeamViewer\Version7
  5. Now close the windows and start the Teamviewer 7. 
  6. Go to the Help and click about. you got the Licence :Corporate 
  7. Now you are start your work without and session delay.
-->
Read More

Thursday, 28 June 2012

// // Leave a Comment

5 Best Free Wireless Networking Tools


1: CommView for WiFi


CommView for WiFi is a packet sniffer that is specifically designed for Wi-Fi networks. As you would expect, the program allows you to capture packets and then search them for specific strings, packet types, etc. One of the most useful features provided by this utility is an alarm (Figure A) . The software can alert you whenever certain types of traffic are detected. Such a feature could go a long way toward improving Wi-Fi securit


2: inSSIDer

inSSIDer is similar to the old Net Stumbler application, except that it has been modernized and it works with operating systems such as Windows XP, Vista, and Windows 7. The application is designed to detect wireless networks and report on their type, maximum transfer rate, and channel usage. There is even a graphical representation of each wireless network’s amplitude and channel usage.


3: Wireless Wizard

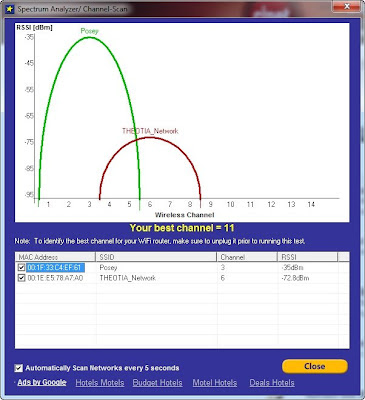
Wireless Wizard is a free utility that is designed to help you get the best possible performance from your wireless network connection. In addition to providing all manner of statistics about your wireless network, the software offers a series of diagnostic tests you can use to see how well your wireless network is performing. It also includes a spectrum analyzer that recommends the best wireless channel for you to use.
-->

4: Wireless Key Generator

Wireless Key Generator (Figure D) is a simple application that helps improve wireless network security. It prompts you to specify the type of security you are using on your wireless network and the key strength. It then generates a random encryption key for you to use. The use of random keys helps to reduce the temptation to use simple keys that might be easy to guess.


5: WeFi

WeFi helps you locate free wireless hotspots throughout the world. The application’s initial screen displays statistics related to your current connectivity. It also lets you see a filtered view of available hotspots. You can choose to see your favorite hotspots, approved WeSpots, or any available Wi-Fi. WeFi’s best feature is the Wi-Fi maps, which show you the locations of public Wi-Fi hotspots.


Read More