Basically, BitLocker To Go allows you to encrypt a USB drive and restrict access with a password. Without the password, the USB drive is worthless. When you connect the USB drive to a Windows 7 computer, you are prompted for the password, and upon entering it you can read and write to the drive as you normally would.
During the encryption process, Windows 7 installs a special reader on the USB drive. When you connect the USB drive to a computer running XP or Vista, the BitLocker To Go Reader takes control, prompts for the password, and then basically makes the USB drive a read-only device.
BitLocker To Go can be used by both home and business users. In a Domain system, IT administrators can configure a policy that requires users to apply BitLocker protection to removable drives before being able to write to them. Furthermore, the policy can specify password length as well as complexity.
Setting up a USB drive
Setting up BitLocker To Go on a USB drive is a simple procedure. Once you insert a USB drive, right-click on it and select the Turn on BitLocker command from the menu, as shown in Figure A.

As soon as you do, BitLocker To Go will begin initializing your USB drive, as shown in Figure B. The process is nondestructive, so you don’t have to worry about any data that is already on the drive.

Once the initialization process is complete, BitLocker To Go will prompt you to set up a password that you will use to unlock the drive, as shown in Figure C. If you have a smart card, you can use its PIN to unlock the drive.

After you set up a password or use a smart card, BitLocker To Go will prompt you to store a recovery key, as shown in Figure D. You can use the recovery key to unlock your drive in the event that you forget the password or lose your smart card.

When you create the password and save your recovery key, you’ll be prompted to begin the encryption process, as shown in Figure E.

During the encryption process, you’ll see a standard progress monitor that will keep you apprised of the operation, as shown in Figure F. The amount of time that it will take to complete the process will depend on how large the drive is. As you can see, there is a Pause button that will allow you to temporarily halt the process should you need to perform another task.

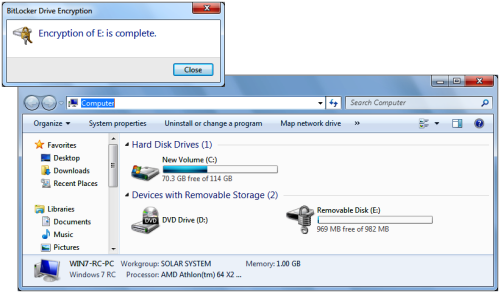
Of course, once the encryption is complete, BitLocker To Go displays a confirmation dialog box and changes the icon associated with the encrypted drive, as shown in Figure G.
Using a BitLocker To Go encrypted drive in Windows 7
When you later insert the BitLocker To Go encrypted drive in the Windows 7 system, you will immediately be prompted to enter the password, as shown in Figure H. If you wish, you can select the Show Password Characters as I Type Them check box, so that you can see the letters; otherwise, you’ll see asterisks. After you type the password, you can select the Automatically Unlock on This Computer from Now On check box to store the password in Windows 7’s password cache.

Once you click Unlock, you’ll see an AutoPlay dialog box that prompts you to view the files or use ReadyBoost, as shown in Figure I. When you click the Open Folder to View Files button, you will be able to access the drive and its contents as you normally would.

Using a BitLocker To Go encrypted drive in Windows XP/Vista
When you insert the BitLocker To Go encrypted drive in a Windows XP or Vista system, you will see an AutoPlay dialog box that prompts you to install the BitLocker To Go Reader, as shown inFigure J. When you click this button, it will take just a moment to install and run the Reader.

You’ll then see the BitLocker To Go Reader dialog box, which will prompt you to enter your password, as shown in Figure K. Notice that the Automatically Unlock on This Computer from Now On check box is missing from this dialog box. However, the Show Password Characters check box is still available.

After you type the password and click the Unlock button, you’ll see the BitLocker To Go Reader window, which essentially looks like Windows Explorer, as shown in Figure L. However, it doesn’t work like Windows Explorer.

If you attempt to open any file by double-clicking it in the BitLocker To Go Reader window, you’ll immediately be prompted to copy the file to the desktop, as shown in Figure M — you won’t be able to open the file on the USB drive.

If you attempt to copy a file from the computer to the BitLocker To Go Reader window, you’ll immediately see the error message shown in Figure N.


0 comments:
Post a Comment