The reason to shrink the hard disk partition you want to install a windows 7 with windows XP and used a dual boot. You want to shrink the system partition because still 65% free space is there. Furthermore, you have defragged the volume, deleted all shadow copies,
and ensured that no page files for this shrinking volume operation. You
have been trying to use the built in Vista partitioning utility to shrink volume, but after that didn’t work.
In Windows XP
Partition Assistant Home Edition (FREEWARE)
can well shrink system partition to meet your needs. The following is
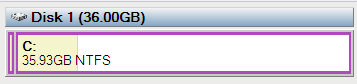
instance to shrink volume the C: drive from 35.93GB to 20GB.
You can launch the Partition Assistant as administrator
privilege. In order to shrink volume safely, we suggest you first close
all other programs before launching the software.
In the above screen, after drag the double-headed arrow to the left, you will see the C: drive that has been shrunk.
When shrink volume C: to a proper size, please remember clicking the Apply (in toolbar) or press Ctrl + Enter, then will popup the dialog box, you need to click the Proceed button to apply the operation to physical disk.
Now, you can create a new partition
in the unallocated disk space (15.93GB) to install dual-boot with
Windows XP. By the example, you will enjoy that Partition Assistant can
completely make up for the shortage of "Shrink Volume" in Windows 7 Disk Management.
In summary, shrinking volume is a advanced repartition
operation, you need to choose a appropriate software to do this.
Windows 7
You have installed in windows 7 and now the windows 8 is launched and you want to use this new version, but as dual boot. therefor you use is simple disk shrink option this facility available only windows 7 and Windows Server. without any other software using you shrink the partition but before shrink you should take a backup to all you important data.
The Windows 7 Disk Management tool provides a simple interface for
managing partitions and volumes. Here’s an easy way to shrink a volume
to free up space so you can create a new partition on your disk.
To shrink a basic volume, simple volume, or a spanned volume:
To shrink a basic volume, simple volume, or a spanned volume:
- Open the Disk Management console by typing diskmgmt.msc at an elevated command prompt.

- In Disk Management, right-click the volume that you want to shrink, and then click Shrink Volume.

- In the field provided in the Shrink dialog box, enter the amount of space by which to shrink the disk.

- The Shrink dialog box provides the following information:
Total Size Before Shrink In MB Lists the total capacity of the volume in MB. This is the formatted size of the volume.
Size Of Available Shrink Space In MB Lists the maximum amount by which you can shrink the volume. This doesn’t represent the total amount of free space on the volume; rather, it represents the amount of space that can be removed, not including any data reserved for the master file table, volume snapshots, page files, and temporary files.
Enter The Amount of Space To Shrink In MB Lists the total amount of space that will be removed from the volume. The initial value defaults to the maximum amount of space that can be removed from the volume. For optimal drive performance, you should ensure that the volume has at least 10 percent of free space after the shrink operation.
Total Size After Shrink In MB Lists what the total capacity of the volume in MB will be after you shrink the volume. This is the new formatted size of the volume. - Can Shrink.


0 comments:
Post a Comment